Soon I will begin to build a 12 x 16 foot shed using dimensional lumber. The shed to our house will be like an expansion tank is to a water pump. How's that for an analogy? It will also help me clean up the landscape around the house. It has been a long and complex vetting process to identify the best design based on a wide variety of factors. Like natural selection, the process yielded conservative results. Getting the shed up brings me one step closer to a few other things I've been looking forward to... a sauna and greenhouse. And I think I found the perfect sauna for me.
With more freezing days than warm, a sauna is more valuable than a greenhouse. I can have an 8 x 12 sauna transported wherever I may move. A collapsible greenhouse can also be delivered wherever I want. In my area where falling trees are an everyday reality, using sheet plastic to cover the greenhouse is a justifiably cautious approach. Off the top of my head, the best greenhouse I ever stepped inside was my wife's grandmother's greenhouse in Japan - a plastic sheet covered metal pipe box barely five feet high. It had some of those delicious Japanese grapes inside. The second best was Rosie Creek Farm's big wood truss greenhouse. A shed is really too big to move, it stays in place just as the house does. The greenhouse and the sauna form the backbone of recreation during the summer and winter. Each is a staycation in itself. I can play in the snow and cold, and in the summer watch plants grow and mold. And these are both very social activities, to be shared and enjoyed in the company of others. What a nice thought! They are also outdoor oriented activities; I love spending my time outside.
Another thought, the thought of moving somewhere else, somewhere near the ocean, comes up occasionally. To me, a beach is a magic place, a spiritually expansive place, the edge of a vast empire. Aside from the rhythm of the waves, the rocky shoreline, and the alien like life I can find there, I can also see for miles and miles, sometimes without limit. I don't have that experience where I am at right now, but the good news is I think I can, if I build the sauna at the top of my hill and resting on an observation platform to get me an extra five to ten feet from the ground (not mobile) that is situated at the point where the slope changes the most. The added height may minimize the risk from falling trees, and I'll have a view of the Alaska range and probably Denali if I am lucky. Not to mention the aurora straight overhead. The wind and the landscape from there will help me connect with that same feeling again.
Showing posts with label construction. Show all posts
Showing posts with label construction. Show all posts
Thursday, July 8, 2010
Friday, March 26, 2010
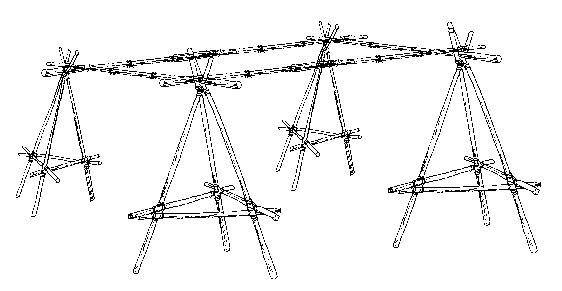
A cruck building technique
A ridge-beam can be supported by two tripods to make a pioneered "tripod-cruck" building. with the ends of tie-beams extended outward, the side walls can be framed just as in a conventional cruck building. This would work well. But while contemplating this idea I came across a picture I saved about six months ago that provided me with inspiration for how to raise a cruck building on uneven ground single handedly.
 Build two tripods and support a tie-beam across them. Adjust the beam for level by pulling in or extending outward the tripod legs to raise or lower the tie-beam's ends. Then attach the cruck blades to the tie-beam (as in above picture) and place concrete piers under them. Repeat this procedure for the other gable end of the building. Place a ridge-beam across the two pairs of crucks. Place the wall plates across the ends of the tie-beams. Brace the structure, then remove the four tripods and it should remain standing firm and solid. Sheath the building as desired. When finished it should be a single-bay cruck building with a clear and unobstructed interior.

Wednesday, February 24, 2010
2010 evolution of greenhouse concept (thus far)
Maybe I should blame the planted aquarium I started late last year. After all, it is just as culpable in reigniting my interest in building outbuildings, and in particular a greenhouse, as anything else. I had a desire to expand a growing trend. Since the start of this year my ideas have evolved quite a bit. Here is a fairly comprehensive (yet incomprehensible) list detailing the evolution:
Tuesday, January 19, 2010
Cabin fever Takedown: It never had a chance
Winter time in the Tanana Valley is cold, dry, and dark (but McKelvey Valley beats it on all three counts). Organisms here must either leave or adapt when the conditions become increasingly harsh. This adaptation can be both biological and behavioral. Humans tend to simply transform their immediate environment to suit their needs, spending nearly the entire winter in enclosed buildings, where an "African savanna" environment is artificially sustained. This is in contrast to warmer locations, such as Cappadocia where people have lived in places such as Uçhisar Hill and Castle, which is a large block of sedimentary rock sitting on a hill with rooms and stairways carved into it. (Uçhisar Castle puts Gaudi to shame, and Gaudi is peerless.) Sustaining emotional/psychological health in a harsh environment is also a concern. An indoor aquatic garden can relieve cabin fever. This winter around Christmas time I had unintentionally bred Buenos Aires tetras, and three lucky fry are now half an inch long and thriving in a separate tank. This is not a common event, in fact I think it puts me in a whole other class of fish expertise. (Still, though, it is more common than keeping a walking sea pig.)
Another way to relieve cabin fever is to do more outdoor activities. This summer I plan to build a few small outbuildings: a woodshed, a greenhouse, and a sauna. A sauna is a lot of fun in winter, its just a wood box with a stove. A greenhouse can allow an aquatic gardening hobby to explode in the summer, produce an abundance of fresh vegetables for the kitchen, and provide a platform for experimenting with photovoltaic power. A woodshed will keep my wheeled steeds ready for a ride at a moments notice, provide much needed outdoor storage to keep the property looking tidy, and allow me to test the appearance of shou-sugi-ban (焼杉板). After learning a few things about construction, I feel these projects (or at least one of them) lie within my means and ability to complete this summer. For a basic foundation, I will use flat solid concrete blocks and/or triangular concrete pier blocks with flat or slotted tops (to accept a beam or post). Some of these have anchor bolts and metal brackets already set. This should be sufficient on well drained soil that does not expand when freezing. A trip to the local hardware and lumber store is definitely planned! I'll need a good reference book, like Joseph Truini's “Build Like a Pro: Building a Shed”. I know that these aspirations depend upon my personal health, and my employee and academic performance, and that they should be balanced with improving my digital media and language skills. It's a reachable goal that requires my full conscientious effort.
Architectural flair is essentially unnecessary. Here are two pictures, one from pg. 46 of Shelter by Lloyd Kahn and the other from pg. 172 of Low-cost pole building construction by Doug Merrilees, Ralph Wolfe, and Evelyn V. Loveday. The first describes how to build a shed floor, the other is a basic shed. This is primary reference material for the building projects. With glazing in place of wood siding, I have a greenhouse. With wood siding and a stove, I have a sauna. With just wood siding, I have a shed. One basic format, three different buildings.


Monday, October 26, 2009
A carnival of Eastern things
I have begun to read Stephen Batchelor's book "Buddhism Without Beleifs". So far I have been impressed by his erudition. It is telling that he has attracted his share of criticism as well. In an article by John Horgan for Slate, he asks Batchelor why he should even bother calling himself Buddhist at all, since he doesn't go in for all the supernatural stuff anyway. Good question. But I think it is the pride of tradition combined with the relative difficulty of transplanting the Buddhist value system into another ethical framework. No sense in doing that without good reason.
I really like the look of shou-sugi-ban (焼杉板) or "burnt wood siding" ever since I saw it in an issue of Dwell magazine describing the work of Terunobu Fujimori. It would look nice on a garage (buildings which have become by default the modern equivalent of a shed or barn). With a shed roof to match my house it would look very nice. Maybe a small water heater, insulation, vapor barrier, and attached three season greenhouse?
Any independent scholars out there that would care to write a paper for the ISCSC? I know the receiving editor and they have a list of suggestions to get your creative juices flowing.
Monday, October 19, 2009
Takashi Amano

Sources:
http://www.akvaportal.cz/?id=31
http://viktorlantos.com/wordpress/2009/01/20/akvariumok-takashi-amano-orias-akvariuma/
Wednesday, September 2, 2009
Ainu and Sioux

(Here is a simple 3D drawing of the way the shed was put together.) Impatient with my progress on the shed (in light of the decreasing time available in which to complete it), I returned to the drawing board looking for a simpler means to building a structure for outdoor storage, while trying not to compromise my core aesthetic ideals. The first thing that could be simplified is the complex joinery in a Norwegian trestle frame building. For while the way the joints lock together is beautiful, the cuts take considerable time and energy to get right. On original longhouses, whether constructed by Vikings or Native Americans of the Pacific Northwest, the construction was much simpler than trestle frame buildings- it was possible to build them such that no more than two logs met at any joint. So I tried this, but after erecting the first post and beam unit, I soon found that without careful measurements the posts would not stand plumb and square. Though not too critical, the combined error of all the posts together seemed to present a problem. I needed a faster solution. I returned to another alternative construction method I learned about from the Ainu four months ago. Instead of posts supporting the beams, I could use tripods. This is how the Ainu built their houses, and as I learned later, it is also the foundation of most tipis, such as those used by the Sioux. If I lash three posts together, I create a tripod. If I set out four tripods and lay beams across them, I create a shed roof. A tripod requires only rough cuts, and can be put almost anywhere. Shelving, and hooks for tools, could easily be mounted on walls that do not bear the full weight of the roof. I could also make a reciprocal frame roof for the shed, or add two more tripods and make the shed a hexagon shape... there are lots of possibilities. Overall, this seems the most expedient solution. Still, the question remains, can three angled posts bear the same weight as a single vertical post? I will find out.
Friday, August 21, 2009
first joint
 I got serious about building my shed on the 18th of August. I got the logs together, got the chainsaw going, and made some cuts. The weather had other plans for me though, and the rain drove me inside for the rest of the evening. On the 20th I got back outside and made a few more cuts. Finally I have an actual joint to show for it (click the image for a larger view)! Three more of those, and eight other shallow cuts and the basic joinery is all done. You can see most of the tools I've used laying about in the photo. The hard part will be raising the beast when the time comes. A lot of rope and pulleys will be needed.
I started making newer, more accurate diagrams of the joinery than those I posted earlier, but decided it would be easier to just build it and take photos of the actual joints instead. Better than any illustration I could make. But I did create a list of eight steps for how to build a simple trestle building:
- Select logs (simplest: 4 posts, 2 beams, 2 rafter-holders; also 8 diagonal braces and 10+ rafters).
- Make 5 primary types of cuts for the joinery w/ chainsaw, axe, chisels.
- Assemble on ground before fully erecting to adjust and ensure fit.
- Select and cut to fit rafters.
- Screw diagonal braces to post and beams and erect the two pairs on cinder blocks.
- Place rafter-holders on beams and screw diagonal braces between them and posts.
- Screw on rafters and roofing.
- Dirt or wood floors, and (traditionally) walls are several feet outside of posts, (though may be attached directly to posts).
Wednesday, July 22, 2009
second thoughts
 In a burst of creative thought over the last few days I scoured the pages of my architectural books and magazines (in several languages) as well as the Internet looking for anything that would help me put together a second generation house for my family, as that possibility has been simmering in the back of my mind since returning from our last vacation recently. It started with a trestle-frame addition to stick-frame building, progressed to a long building with a floorplan reminiscent of a mobile home or ATCO structure, and later incorporated a "ryokan" and numerous storage and space saving ideas. At this point it seemed over engineered and I rejected it all, asking myself "Did I lose sight of what's important?" (Double meaning fully implied, as I had been neglecting other responsibilities in pursuit of an ideal house design.) I took the contrary position, feeling that a trestle-frame, like a geodesic dome, should not be a house, as its form is not plastic enough and too rigid. I looked at the other-beauty of rammed earth. Then I reviewed photographs of real trestle-frame buildings, and loved this one of a barn. In America, there was a vogue about a decade ago of restoring old American timber frame barns and converting the interiors into houses. The cathedral ceilings and exposed ancient timbers created a warm (insert adjective evoking fondness of aged things) ambiance that afficionados of the type loved. They didn't substantially change anything about the barn's dimensions. I can learn a lesson from this comparison, as I won't change the dimensions or proportions of this Norwegian barn. I will simply fit the modern American lifestyle within its timbers.
Update: I'd like to build alcove beds, as used in roykstova (traditional Faroese houses), into the sides of a trestle frame shed of about these dimensions.
Sunday, May 31, 2009
DIY lawn irrigation
Tired of lugging around 50 foot sections of garden hose every day to water the lawn, I set out to automate the system. I was told that water sprinklers were preferable to drip irrigation or soaker hoses. I went to Home Depot, Lowe's, Fred Meyer and Walmart to compare products and prices. When I put it all together later that same night, I ended up with an impressive system that makes watering the lawn a snap. And I found out that plumbing my lawn's irrigation is as much fun as aquarium plumbing; it is really satisfying when it all comes together well. My system basically consists of two separate runs of impact sprinklers. The lower run has three impact sprinklers and the upper run also has three impact sprinklers with a soaker hose added at the end. Each sprinkler is separated by 50 feet of garden hose.
 The picture here shows what this looks like. The large rectangles are two voluminous water tanks that lead to pumps. One of the pumps has an expansion tank, while the other does not. These lead to a system of valves that may be opened or closed (indicated by "equal" signs) and water emitting devices (small circles). The water tank without an expansion tank is connected to the roof gutter via piping.
One of the more unique parts of the system is how the pump is operated. The pump sits above the underground rainwater storage tank, but in order to draw water up (since it is not submerged in the tank) it must first be primed with the addition of water to the pipe leading to it so that it can maintain a suction. I attached a garden hose to an outdoor water spigot on my house and put the other end on the garden tank pump. (You can see in the diagram that a system of valves links the two pumps together.) Water is forced into the garden tank pump when the nozzle is turned on. Once the garden tank pump and piping is filled, it is turned on and the outdoor water spigot is turned off. At this point the garden tank pump is fully operational. Due to the length of the irrigation lines only one run of sprinklers is operated at a time to maintain sufficient pressure in the system. It all works very smoothly and only the opening and closing of valves in the system is needed to start and stop the whole system from beginning to end. I can buy an automatic timer to run the system when I am on vacation, some of the fancier models of these use a moisture sensor to prevent over watering.
Tuesday, April 14, 2009
In other news...
The monthly review of magazines at the local bookstore yeilded a few good articles. First off were a few about Roald Gunderson, who builds houses using trees in their natural state. They are not cut into dimensional lumber. The results are unorthodox to say the least, and once you are past the shock it is really very charming. But what impressed me the most were the structural advantages of this approach, as well as the low cost and sustainability of this construction method.
But if you ask enough people, you will soon discover that very few things are genuinely new. Roald Gundersen's approach, while already tried by a few creative hippies, was presaged hundreds of years ago in the form of Japanese Minka houses, which utilize long unmilled tree trunks as structural beams and rafters. The "taiko beam" is especially graceful. They are truly beautiful buildings.
Also not new is Robert Lanza's idea of scientific biocentrism. This idea already existed within Chinese philosophy hundreds of years ago. One well known example is Wang Yang-Ming. Lanza does reinterpret this idea for a new generation and places it within the context of modern science, giving it new life. So I am glad for that.
I also came across an article in Natural History Magazine about the role of alloparenting in human evolution.
Subscribe to:
Posts (Atom)